
A very common first-VPS experience goes like this:
"I bought example.com on Namecheap. My app is running on the VPS, listening on port 3000. When I type example.com in a browser, I get a site cannot be reached error. What am I missing?"
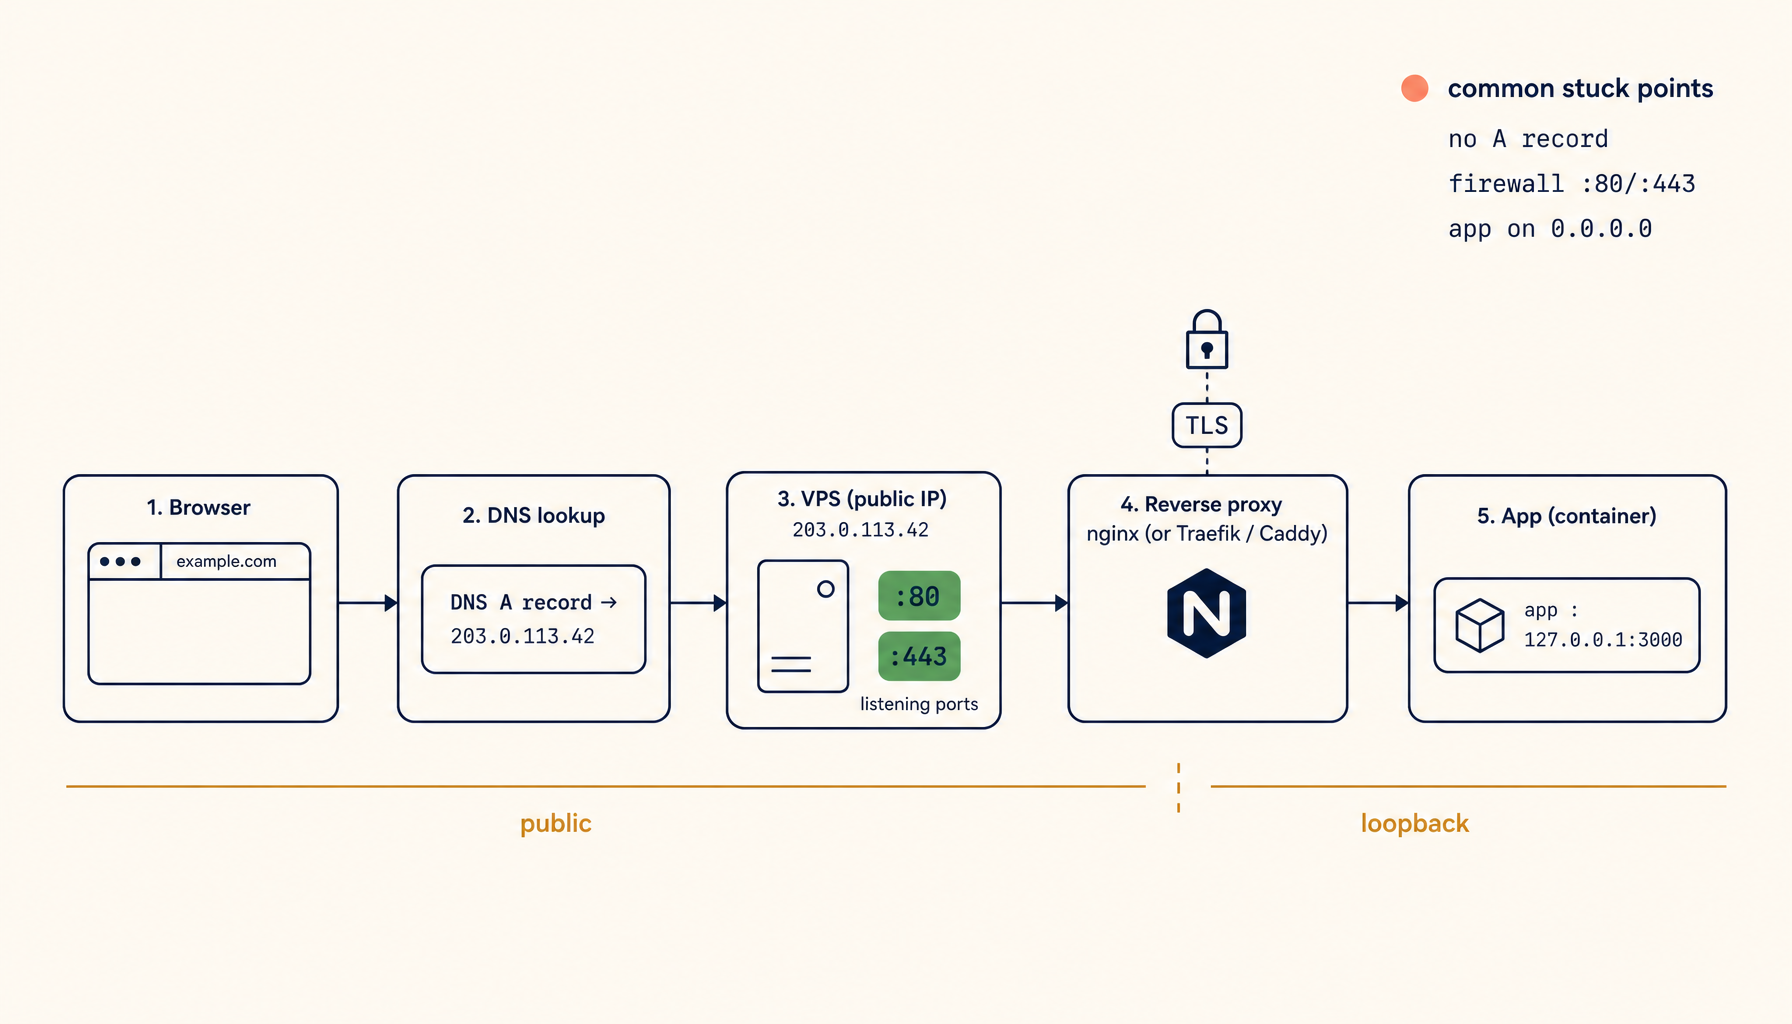
Every existing tutorial answers the next question — how to configure Nginx, how to set up Certbot, how to bind multiple hostnames — but skips the one underneath it: what actually happens between typing a name in a browser and bytes arriving at port 3000 on a Linux box. This post is that missing layer.
Once the model fits in your head, every "site is broken" message turns into a specific, locatable problem instead of a fog of unknowns.
1. What "domain" actually is
A domain name is a string that resolves to an IP address through DNS. That is all it does.
Buying example.com from Namecheap or Cloudflare does not bind the name to your VPS, your app, or anything else. It gives you the right to publish records in DNS that say "this name → this IP". Until you publish those records, the name resolves to nothing useful, and a browser typing example.com has no destination to connect to.
This is the first place beginners get confused. Owning a domain is paperwork. Routing traffic to a server is a separate, second action you take through DNS records.
2. The DNS A record
The record that maps a hostname to an IPv4 address is called an A record. The smallest possible version looks like this:
example.com A 203.0.113.42
The IP on the right is your VPS's public IP — the one your hosting provider showed you when you created the instance. You add this record in the DNS panel of whoever runs your nameservers, which is usually the registrar (Namecheap, Cloudflare, Porkbun) unless you delegated DNS elsewhere.
Confirm the record is live with dig:
dig +short example.com
If that returns your VPS IP, DNS is doing its job. If it returns nothing, returns the wrong IP, or hangs, the first 80% of "site cannot be reached" issues are right here. No proxy config or TLS config will help until DNS resolves correctly.
3. The IP-to-machine arrival
Once the browser has the IP, it opens a TCP connection to either <ip>:443 for HTTPS or <ip>:80 for HTTP. That packet leaves your laptop, traverses the internet, and arrives at the public network interface of your VPS.
The VPS kernel receives the packet and looks for a process listening on that port. If something is listening, the kernel hands the connection to that process. If nothing is listening, the kernel rejects the connection and the browser shows "connection refused" or "site cannot be reached".
The diagnostic to run on the VPS itself is:
sudo ss -tlnp | grep -E ':(80|443)'
This lists every process listening on TCP ports 80 or 443. If the output is empty, no process is bound to the public web ports — which is, in fact, the default state of a fresh Ubuntu VPS that has not been configured yet.
4. The first port problem
Your app is on port 3000. Browsers send to 80 and 443. Nothing on the VPS is listening on 80 or 443. This is the most common stuck point on the entire path.
There are exactly two ways out:
- Bind the app directly to 80 or 443. This requires either running the app as root or granting it the
cap_net_bind_servicecapability, because Linux reserves ports below 1024 for privileged processes. It also means your app is doing TLS termination itself, has to handle redirects, and competes with anything else that wants 80/443 on the same machine. - Put a reverse proxy on 80 and 443 that forwards to 3000. The proxy listens on the privileged ports and forwards each connection to your app on its unprivileged port. This is what every production setup uses, because it cleanly separates "talk to the public internet" from "run application code".
Path two wins for almost every real deployment. The rest of this post assumes you are taking it.
5. What a reverse proxy actually does
A reverse proxy is a process that accepts incoming connections on one port and forwards them to another process on another port. That is the whole job description.
The smallest possible Nginx config that proves the concept:
server {
  listen 80;
  server_name example.com;
  location / {
    proxy_pass http://127.0.0.1:3000;
  }
}
Three meaningful lines. Nginx listens on port 80, matches requests where the Host: header is example.com, and forwards the request body and headers to the local app on port 3000. The same shape works for Caddy, Traefik, and HAProxy with different syntax — the model underneath is identical.
Test the config and reload:
sudo nginx -t && sudo systemctl reload nginx
At this point, http://example.com should reach your app. If it does not, the problem is in one of the steps before this one.
6. HTTPS in two minutes
Modern browsers warn loudly on plain HTTP and many APIs flat-out refuse to work without TLS. Production sites need port 443 with a real certificate, not port 80.
The cheapest correct answer is Let's Encrypt via Certbot:
sudo certbot --nginx -d example.com
Certbot proves you control the domain, fetches a free certificate, edits your Nginx config to listen on 443 with that cert, and adds a 301 redirect from 80 to 443. The renewal cron is wired up automatically. Verify the served certificate end-to-end:
echo | openssl s_client -connect example.com:443 -servername example.com 2>/dev/null \
  | openssl x509 -noout -dates -issuer
If the dates and issuer look right, TLS termination is in place and the public surface is now HTTPS.
7. The full path traced once
Walk through what happens for a single browser request to https://example.com once everything is wired up:
- Browser asks the user's configured DNS resolver for
example.com. The resolver consults the authoritative nameservers and returns203.0.113.42. - Browser opens a TCP connection to
203.0.113.42:443. The TLS handshake completes against the certificate Nginx is serving for that hostname. - The HTTPS request arrives at Nginx. Nginx reads the
Host: example.comheader and matches it to theserverblock whoseserver_nameisexample.com. - Nginx forwards the request to
http://127.0.0.1:3000. The127.0.0.1matters: it is the loopback interface, reachable only from the VPS itself. Your app stays invisible to the public internet. - Your app on port 3000 responds. Nginx relays the response bytes back over the same TLS connection to the browser.
That is the whole pipeline. Every "my site is broken" question maps to a specific link in this chain — and the diagnostic is always the same shape: confirm step N works before suspecting step N+1.
8. The seven things that go wrong
In rough order of frequency, these are the failures that account for almost every stuck deploy:
- DNS not propagated. Wait, or test from a network you have not used:
dig +short example.com @1.1.1.1. If your resolver gives a different answer than 1.1.1.1, the record has not propagated yet. - Cloud firewall blocks 80/443. Many providers (AWS, GCP, Hetzner Cloud, DigitalOcean) maintain a firewall layer separate from the VPS itself. Open 80 and 443 in the provider console — security groups, cloud firewall, network rules, depending on vendor.
- UFW or iptables blocks 80/443. On the VPS itself, the host firewall may be active. Check with
sudo ufw statusand allowNginx Fullor 80/tcp and 443/tcp explicitly. - Nginx not running, or config has a typo.
sudo nginx -t && systemctl status nginx. A failed reload often leaves the old process running, which is why the config test matters before the reload. - App not actually listening on the upstream port. Run
sudo ss -tlnp | grep 3000on the VPS. If nothing matches, the proxy is forwarding to a void. - App listening on
0.0.0.0:3000exposed publicly. This means anyone on the internet can hit your app directly on port 3000, bypassing the proxy and any TLS or auth in front of it. Rebind the app to127.0.0.1:3000so only the local proxy can reach it. - Certificate not yet issued.
sudo certbot certificateslists every cert Certbot manages and its expiry. If the domain you expect is not there, the issuance step did not finish.
Each of these maps cleanly to a step in the trace above. That is the point of the trace.
Internal links
- Guide: Multiple Domains on One VPS
- Guide: Multi-App VPS Port Collisions
- Guide: Intermittent 502 from Stale Proxy Upstream
- Guide: Let's Encrypt Renew + Reload Pattern
- ServerCompass: Pick a VPS host that fits this stack
The deeper rule
Every working VPS-hosted website is the same five-component stack: DNS, kernel TCP, reverse proxy, app, certificate. Each piece is small and well-defined; the system is the composition of the five.
Once that model fits in your head, the next outage stops feeling like a mystery. The question shrinks from "why is my site broken" to "which of the five components is misconfigured" — and you already know how to check each one.
Related in the StoicSoft network
If you're choosing a VPS provider or benchmarking real-world performance like the post above explores, StoicVPS is the StoicSoft network's independent tracker for VPS pricing, performance, and migration safety.